Docker Networking: Concepts and Implementation


Docker networking is a crucial aspect of container orchestration, enabling communication between containers and connecting containers to external networks. Here's a brief overview of key Docker networking concepts:
1. Default Bridge Network:
When you run a container without specifying a network, it connects to the default bridge network.
Containers on the default bridge network can communicate with each other using IP addresses.
2. Custom Bridge Networks:
Create custom bridge networks to isolate containers and enhance communication.
Containers on the same custom bridge network can communicate using container names as hostnames.
docker network create mynetwork
3. Run Containers Attached to the Custom Network:
docker run -d --name container1 --network mynetwork nginx
docker run -d --name container2 --network mynetwork nginx
These commands run two Nginx containers (container1 and container2) and connect them to the mynetwork bridge network.
Run a Container on a Specific Network:
To run a container and connect it to a specific network, use the
--networkoption:docker run --network=my_custom_network -d my_container_image
Replace my_container_image with the actual image name.
3. Host Network Mode:
Use the host network mode to share the host's network namespace with the container.
Containers in host mode have direct access to the host's network interfaces.
4. Overlay Networks (Swarm Mode):
In Docker Swarm, overlay networks facilitate communication between services running on different nodes.
Securely connects containers across multiple hosts.
5. Macvlan Networks:
- Macvlan allows containers to have their own MAC and IP addresses on the physical network, behaving like physical devices.
6. Network Inspection and Troubleshooting:
Use
docker network inspectto view detailed information about Docker networks.Troubleshoot connectivity issues with tools like
ping,nslookup, andtraceroutewithin containers.docker network inspect mynetwork
7. Container-to-Container Communication:
Containers can communicate via exposed ports.
Use container names or IP addresses to establish connections.
8. Service Discovery and DNS:
Docker provides built-in DNS for service discovery.
Containers can resolve each other's names using DNS.
9. Connecting Containers to External Networks:
Connect containers to external networks, allowing communication with resources outside the Docker environment.
docker network connect mynetwork container3
10. Disconnect a Container from a Network:
To disconnect a container from a network, use:
docker network disconnect my_custom_network my_container_id_or_name
Replace my_custom_network with the network name and my_container_id_or_name with the container ID or name.
11. Expose Ports:
When running a container, you can expose ports using the -p option:
docker run -p 8080:80 my_container_image
This maps port 8080 on the host to port 80 on the container.
11. External Load Balancing:
- Implement external load balancing for distributing traffic among containers.
12. Network Security:
Leverage network segmentation and firewall rules to enhance security.
Consider using Docker's
--internalflag to restrict container exposure.
13. Network Plugins:
- Docker supports third-party network plugins to extend networking capabilities.
14. Health Checks and Monitoring:
Implement health checks for containers to assess their status.
Monitor network performance and connections.
15. IPv6 Support:
- Docker supports IPv6 for container networking.
Docker networking is flexible and allows for various configurations based on your application's requirements. Understanding these concepts will help you efficiently manage container communication and connectivity within your Dockerized applications.
Until now, we've learned a brief overview of Docker networking. Now, let's practically explore networking. So, let's get started !!!!!
Default Bridge Network:
When you run a container without specifying a network, it connects to the default bridge network.
Containers on the default bridge network can communicate with each other using IP addresses
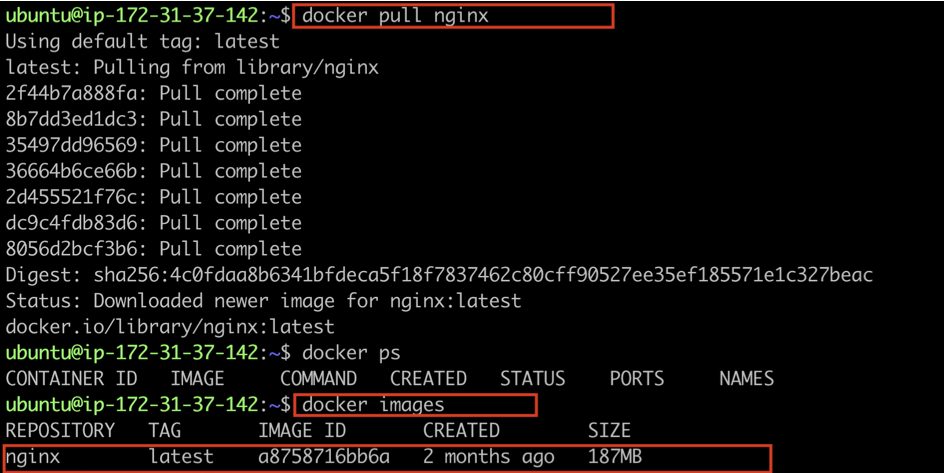
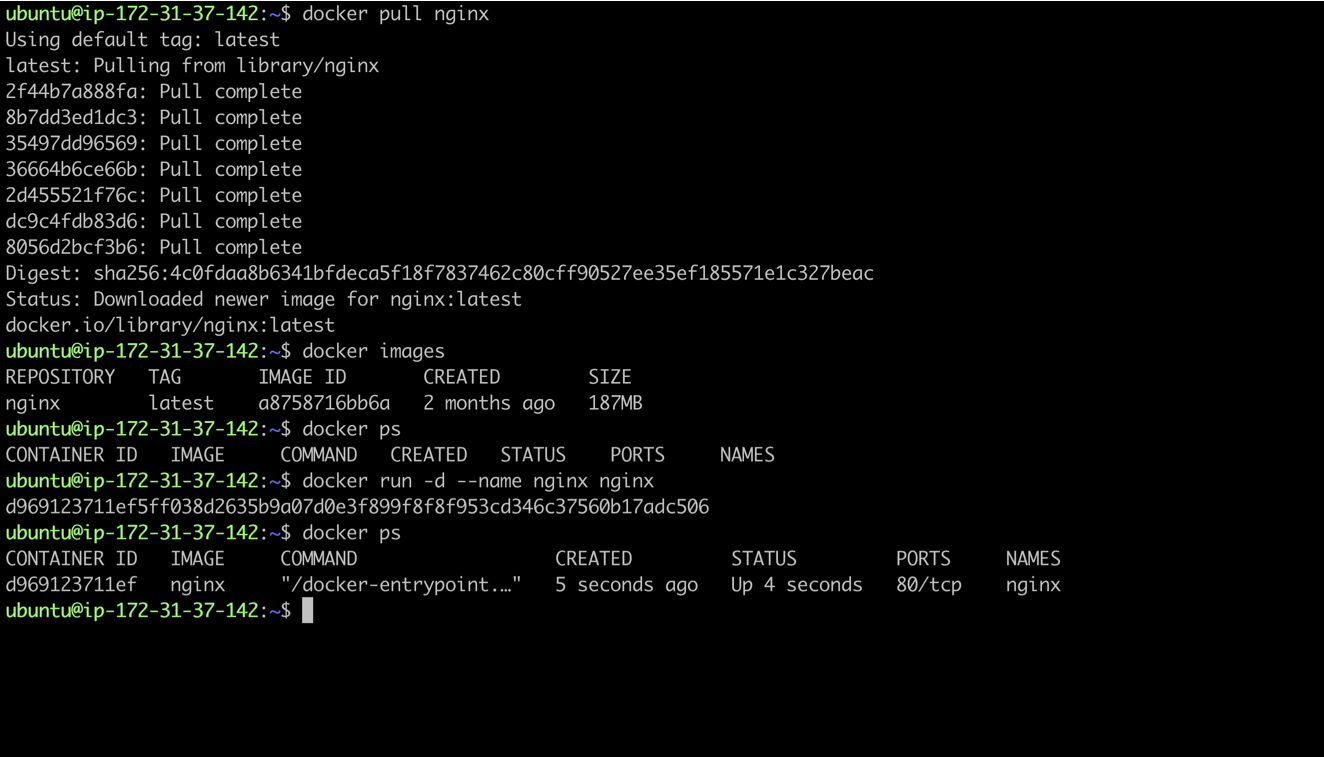
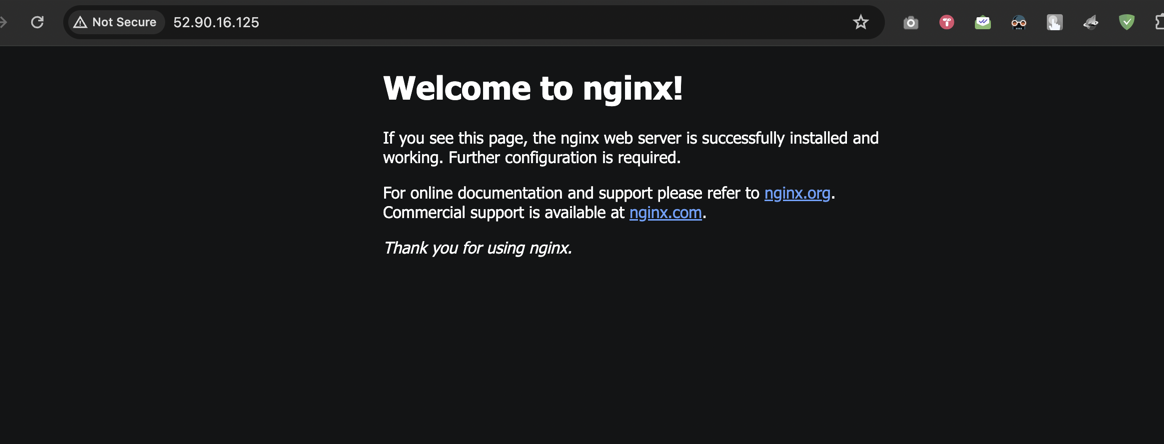
docker run -d -p 80:80 --name nginx nginx

Before starting custom bridge networks, it would be better for us to have a clear understanding of host networks.
Host Network Mode:
Use the host network mode to share the host's network namespace with the container.
Containers in host mode have direct access to the host's network interfaces.
If you're in container host mode, you can directly access it through the host interface. You donot need to publish a specific port number.
docker inspect nginx # docker inspect containerName
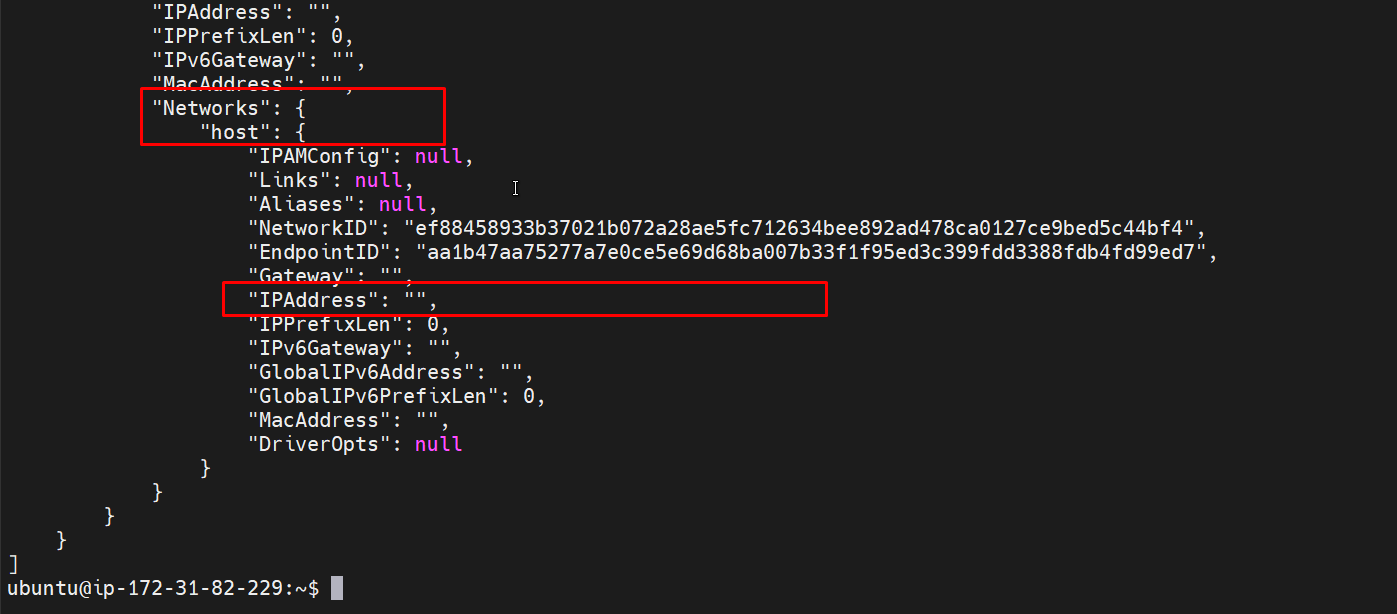
When we inspect a container using the host network, we see that the container is showing the host network and no custom IP address is assigned. This is because host networking binds the container directly to the host. In this case, Docker does not create a virtual network since we can access the container directly through the host network.
Custom Bridge Networks:
Create custom bridge networks to isolate containers and enhance communication.
Containers on the same custom bridge network can communicate using container names as hostnames.
Now we will create a custom bridge network for our Docker container. To do this, we need to execute the following command:
#docker network create your-custom-bridge-name
docker network create nahid-net
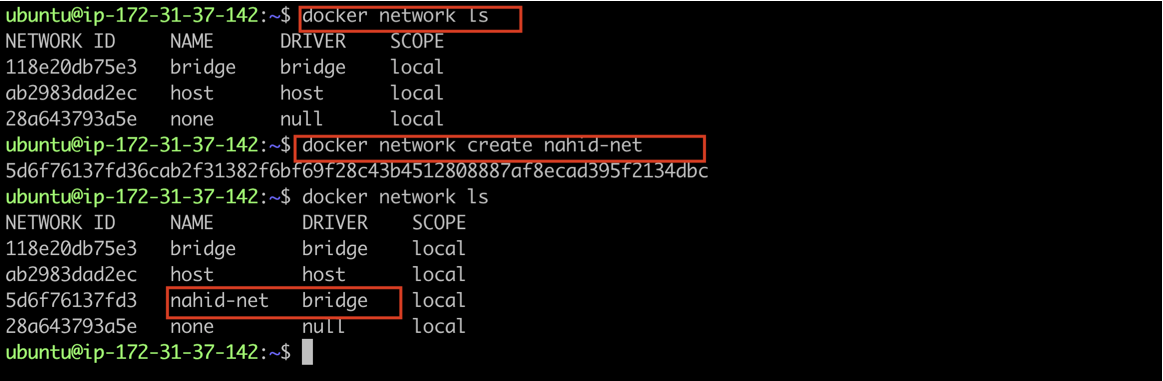
We'll use the "docker network ls" command to check our list of networks and verify that our new custom bridge network, named "nahid-net," has been successfully created.
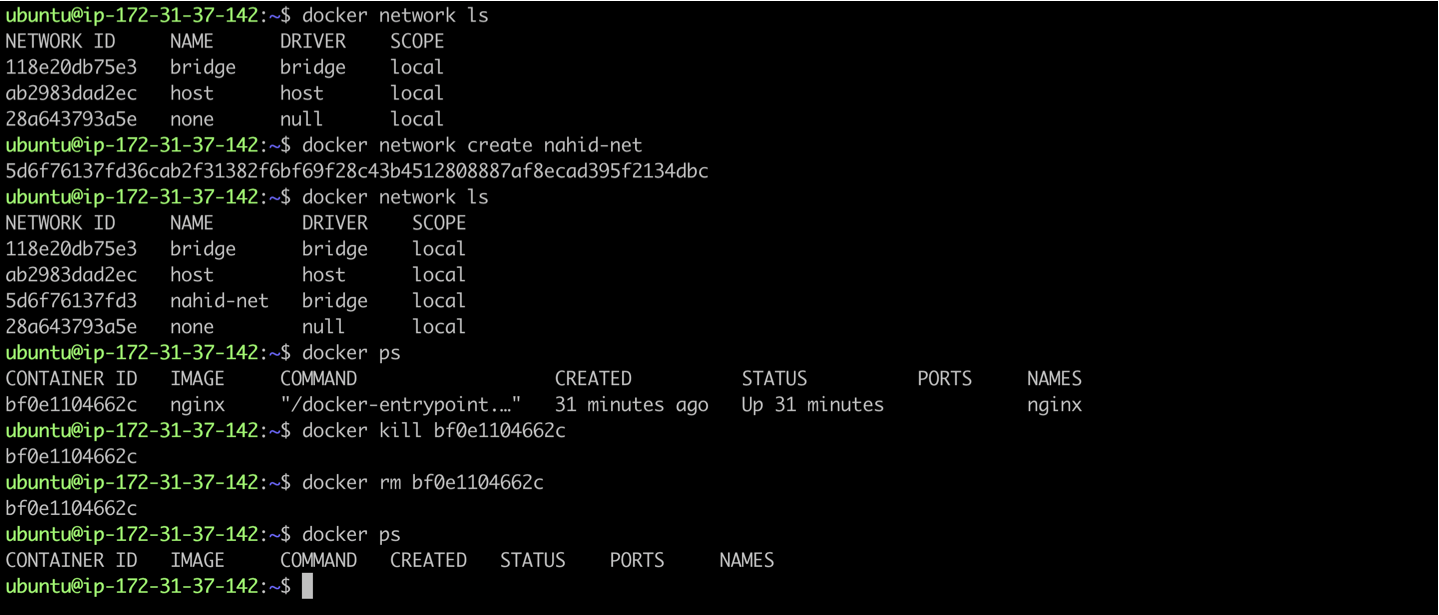
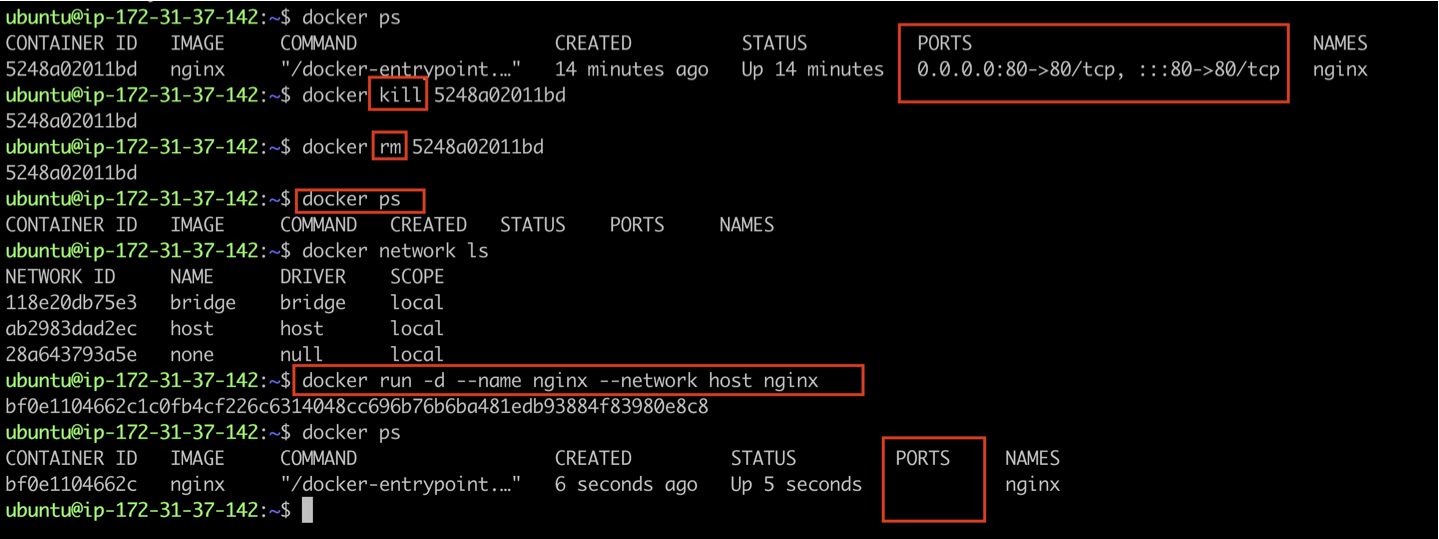
Now, to use our custom bridge network in our container, we'll first remove the previous container by executing the following commands:
docker kill containerID
docker rm containerID
After executing these commands, you'll notice that there's no new container running in the 'docker ps' output. This means we've successfully removed the previous container. Now, let's explore our custom bridge network by creating a new container.
Now, let's run an nginx container named "nginx-def." We won't explicitly mention any network for this container. Our goal is to check whether this container runs under the default bridge network or if it's attached to our new custom bridge network.
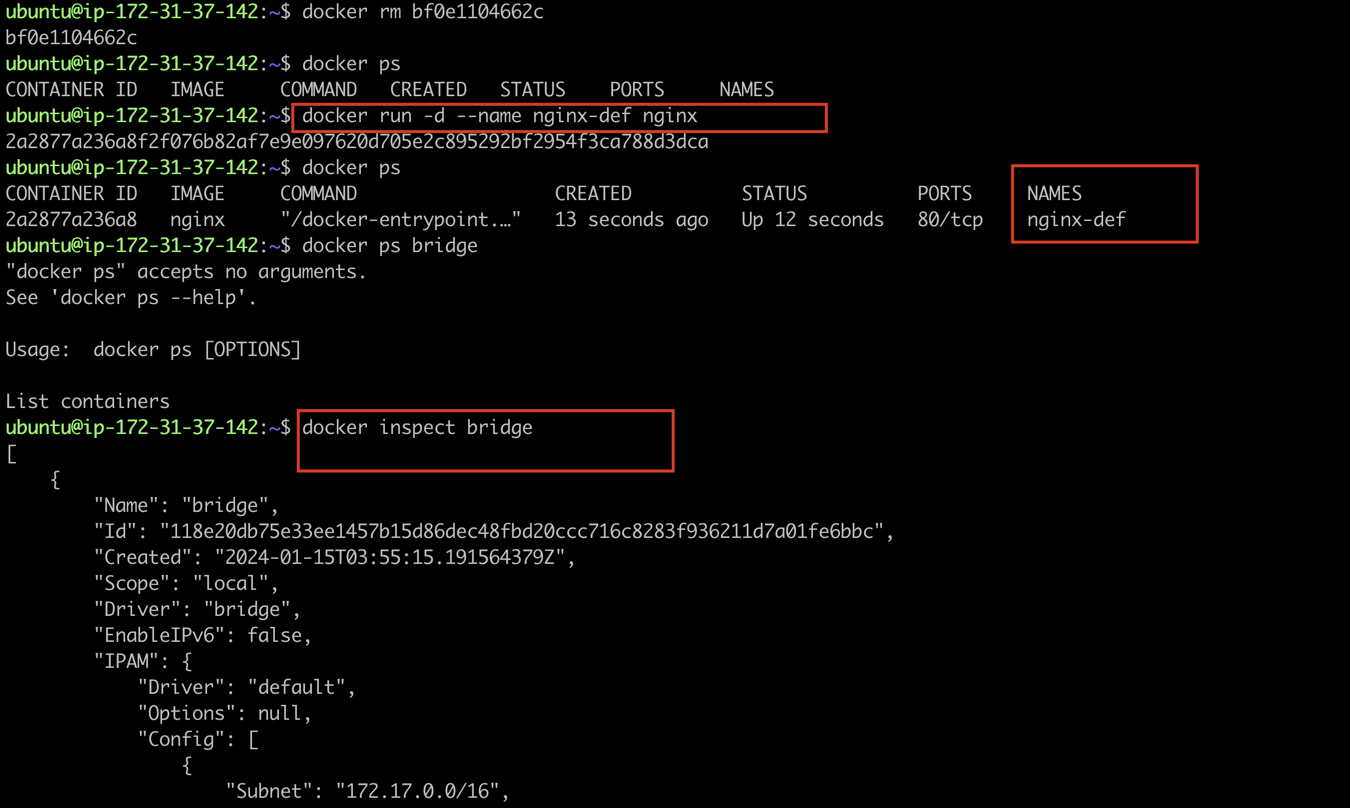
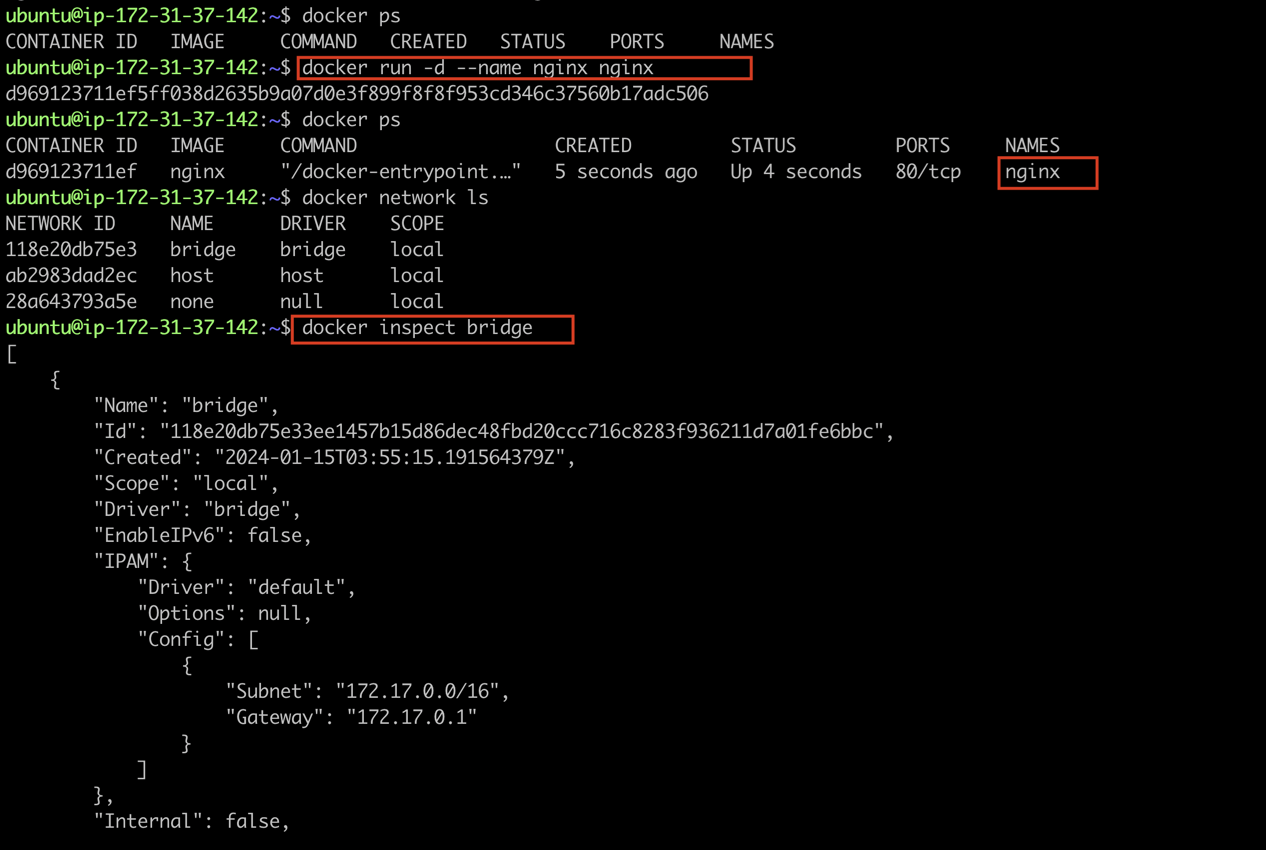
After the "nginx-def" container is running, we'll inspect the default bridge network to see if our container is attached to it. We'll use the following command to execute this inspection:
docker inspect bridge
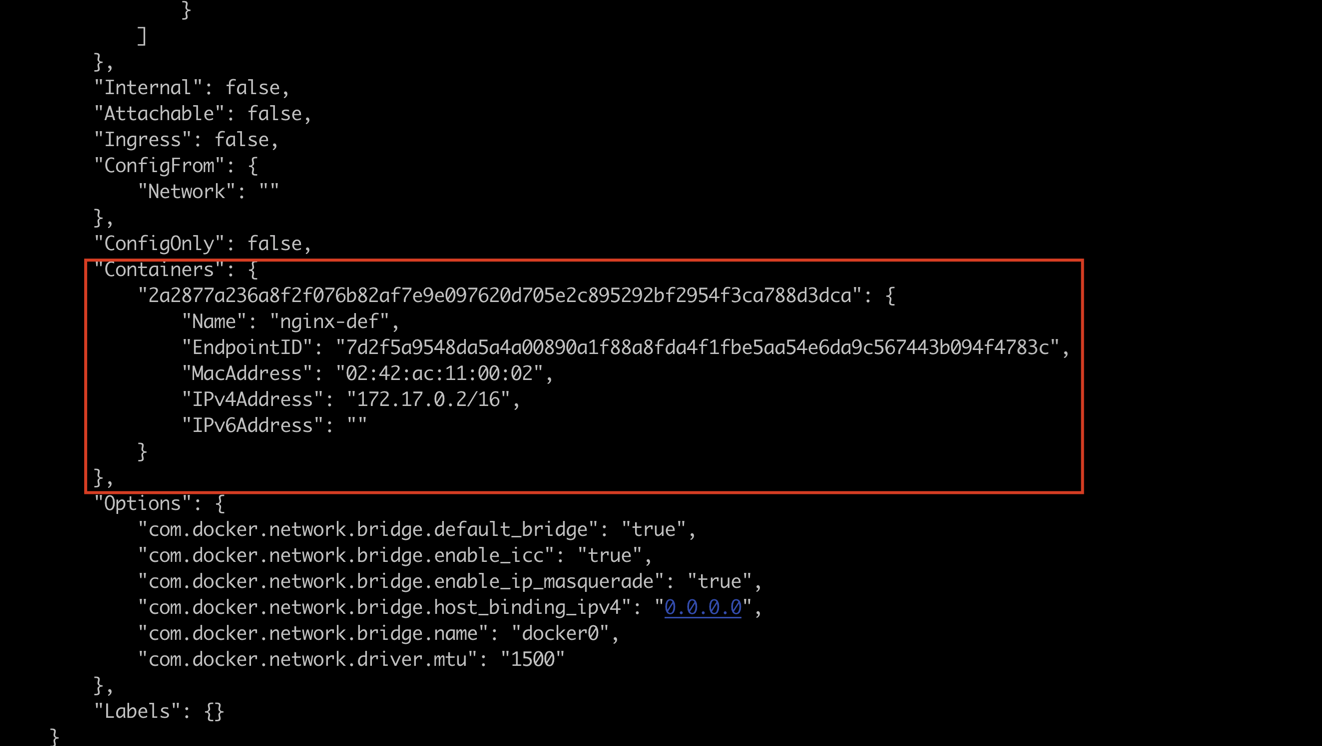
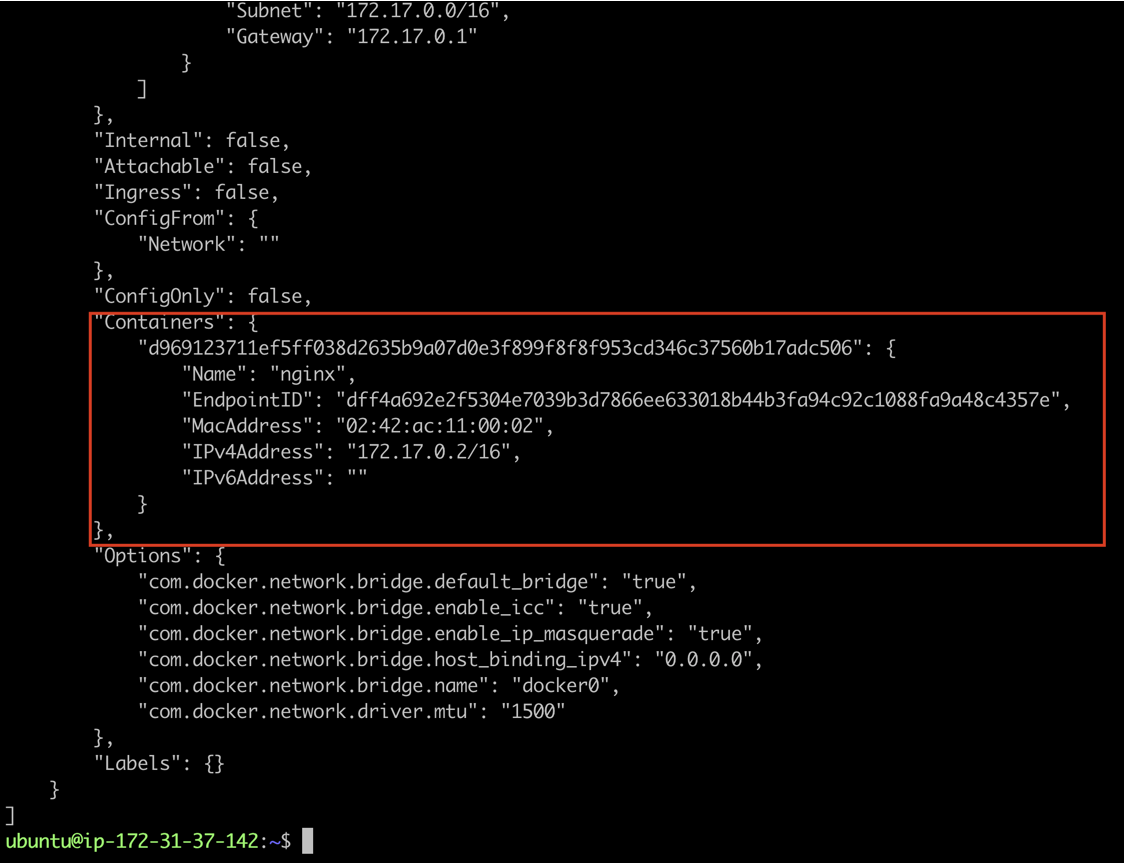
See, our "nginx-def" container is attached to the default bridge network. This means that if we run any container without specifying or attaching it to a particular network bridge, it will automatically be connected to the default bridge.
Now, let's run a container and explicitly attach it to our custom bridge network. We'll then check to confirm whether our container is connected to our custom bridge network.
Execute the following command to attach our container to the custom bridge network:
#docker run -d - -name container-name - -network your-custom-bridge-name image-name
docker run -d - -name nginx-cus-1 - -network nahid-net nginx
Here, we have run two containers named "nginx-cus-1" and "nginx-cus-2", and we've attached both of these containers to our custom bridge network.
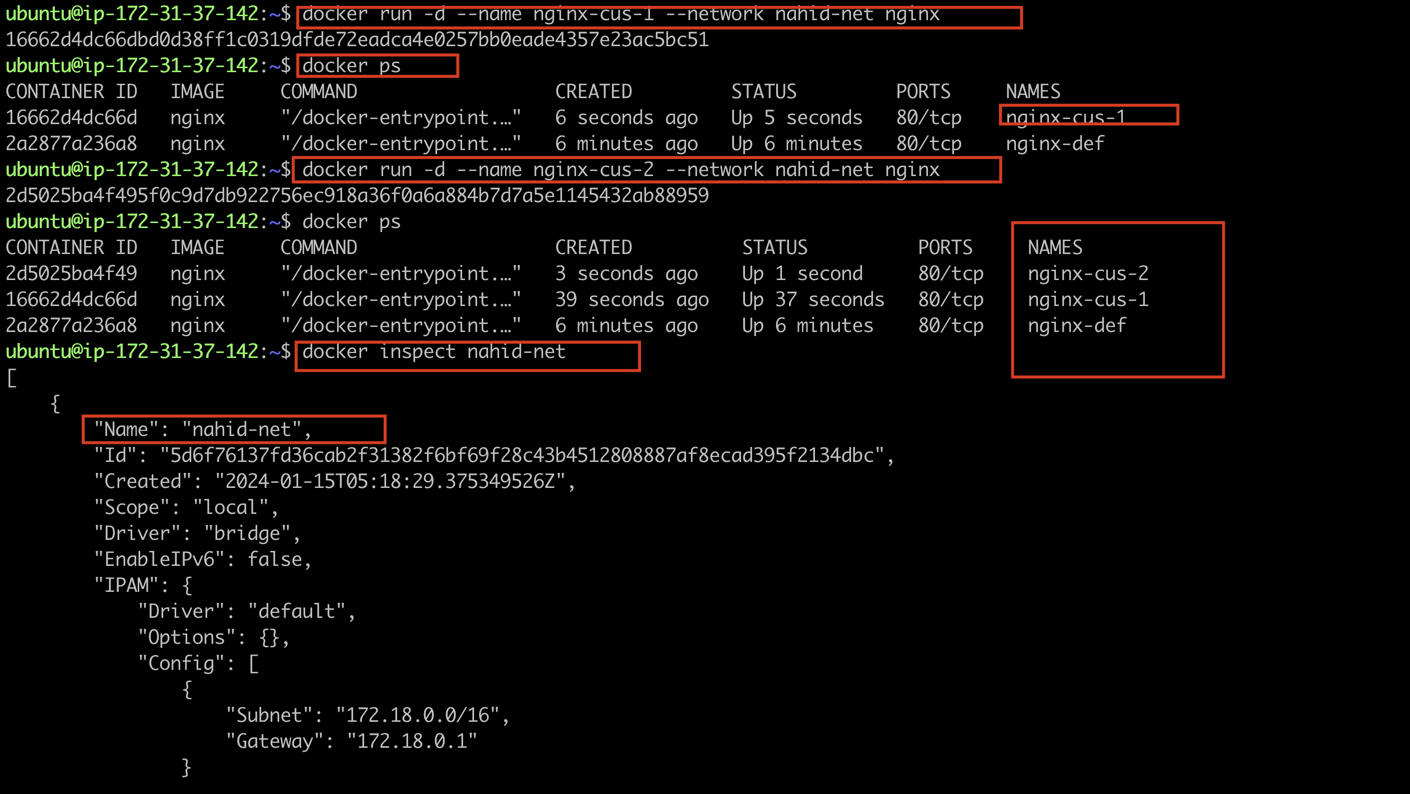
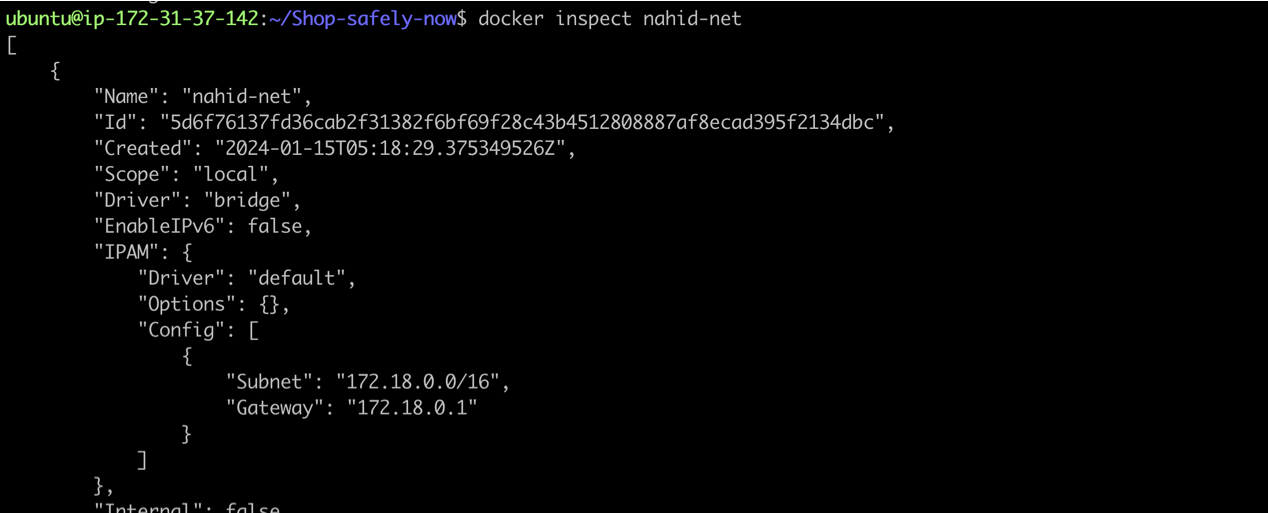
Now, let's verify whether these two containers, "nginx-cus-1" and "nginx-cus-2", are indeed attached to our custom bridge network. To do this, we will execute the following command: docker inspect nahid-net.
Our custom bridge network is named "nahid-net". Therefore, we are checking the details of this network to confirm the attachment of our containers.
docker inspect nahid-net
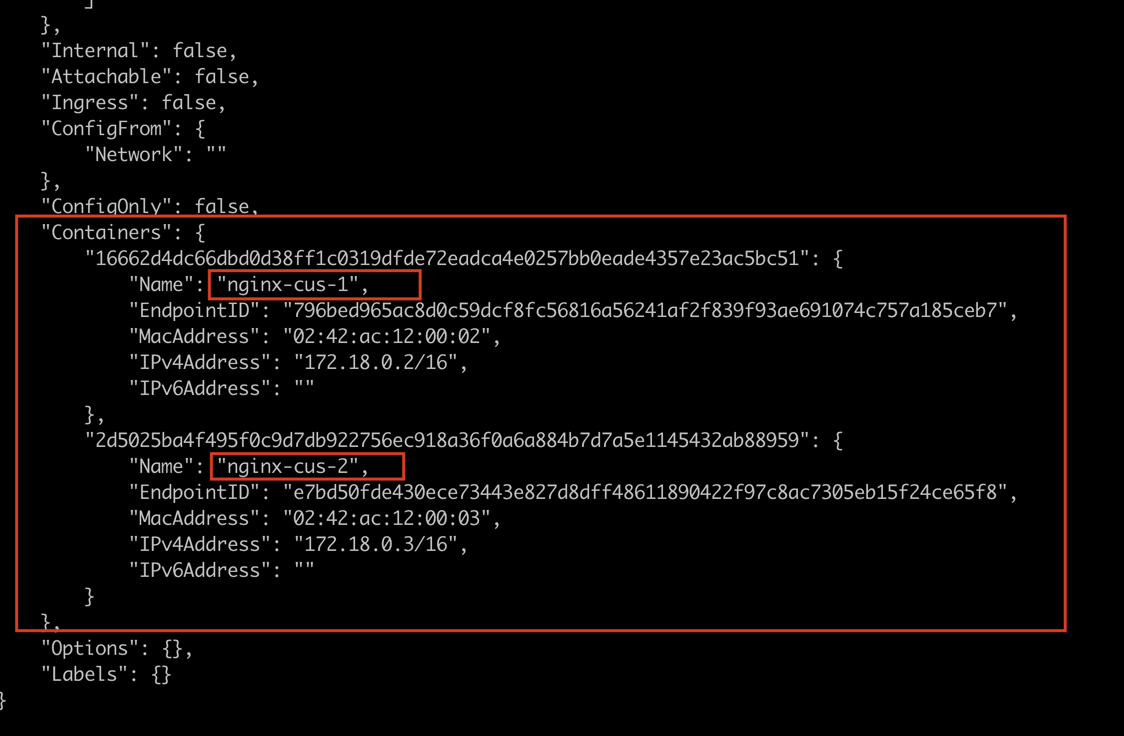
After inspecting our custom bridge network, we've confirmed that our two running containers are successfully attached to the "nahid-net" bridge.
Now, let's apply this in a real-time project scenario. We'll build and run a Docker container, connecting it to our custom bridge network.
Here, I've randomly cloned a project from my Git repository using the command:
git clone git_url
Following that, I've built the Docker image from the Dockerfile using the command:
docker build . -t shop-safely-now

Now, we'll run the built file in container detach mode and attach it to our custom bridge network. To do this, execute the following command:
docker run -d -p 3000:3000 --name shop-now --network nahid-net shop-safely-now:latest
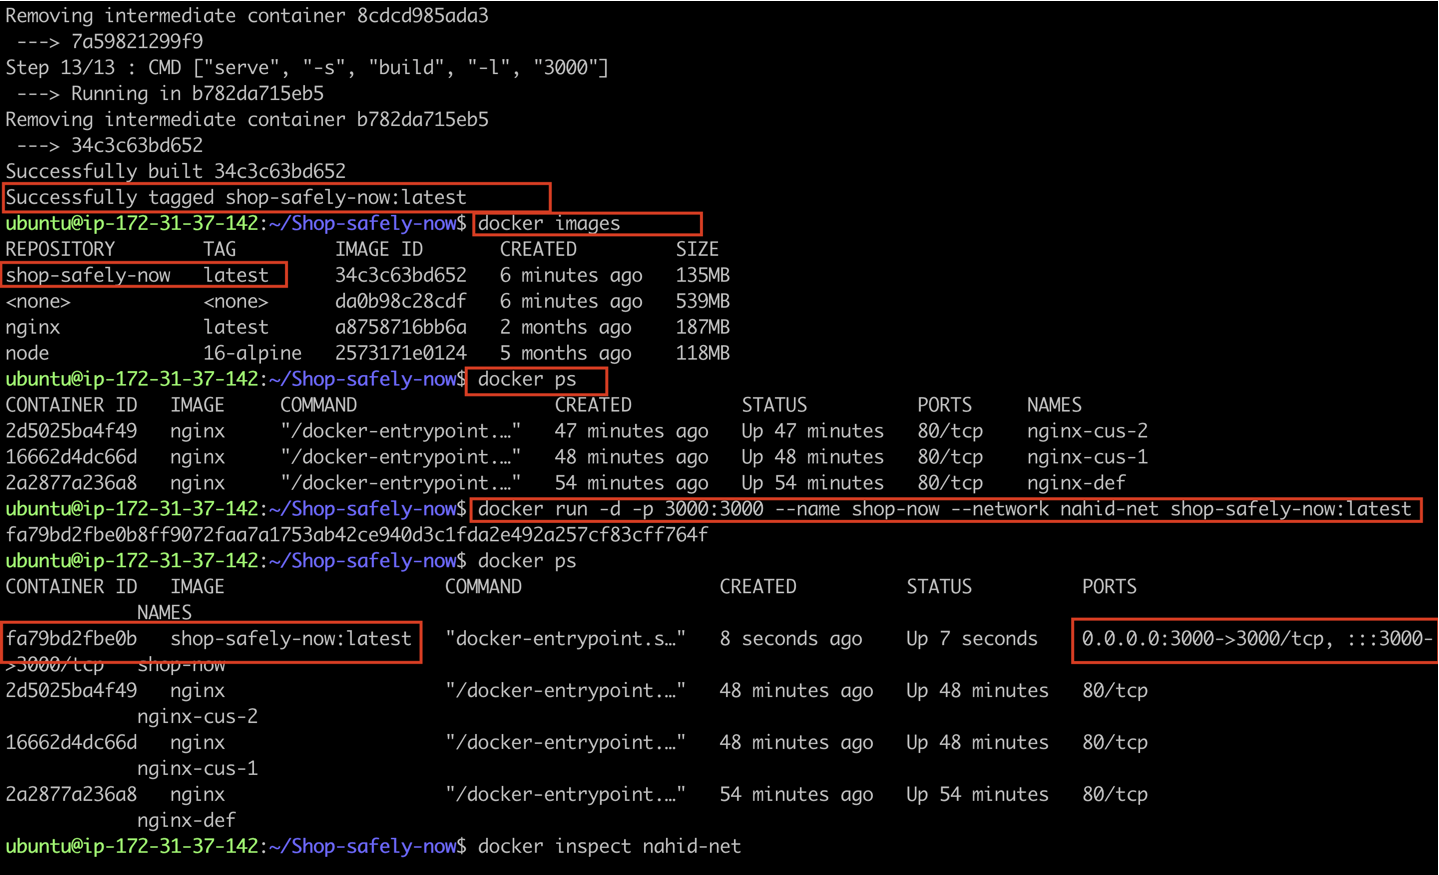
Now, we'll run the built file in container detach mode and attach it to our custom bridge network. To do this, execute the following command:
docker run -d --network nahid-net shop-safely-now
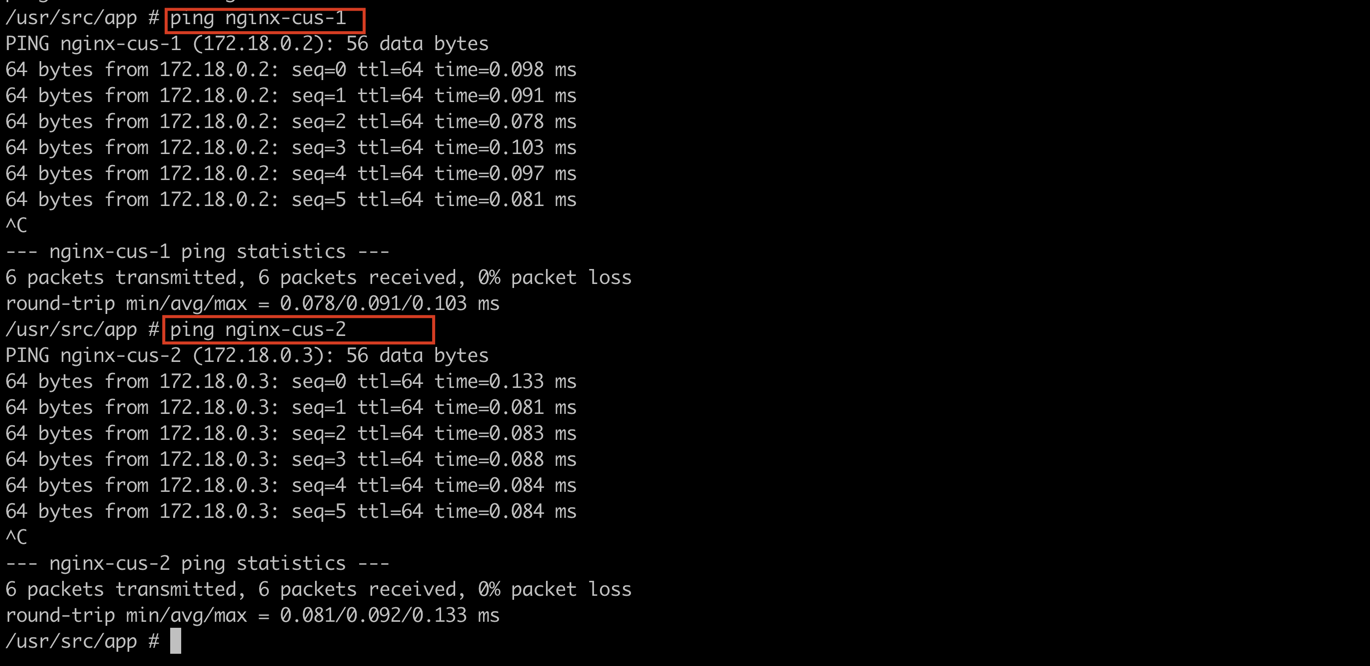
In our custom network bridge "nahid-net," we have these three containers attached. If desired, we can ping each container from another.
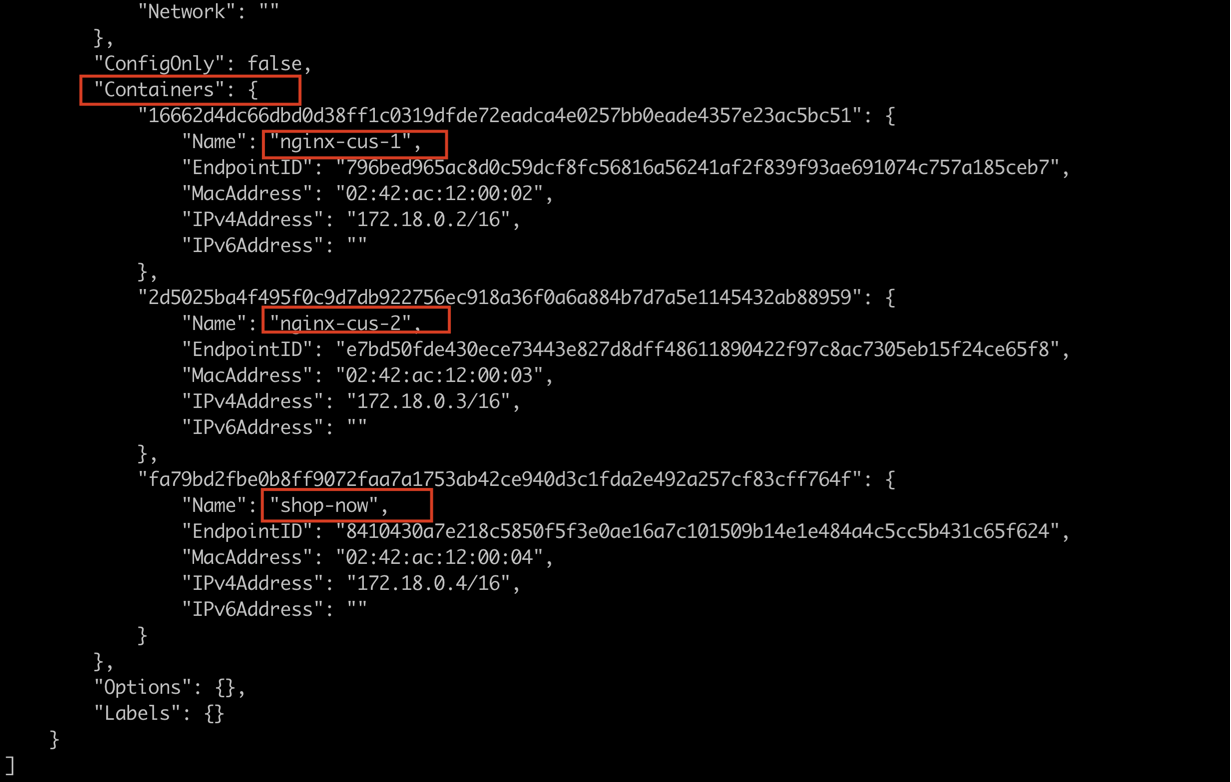
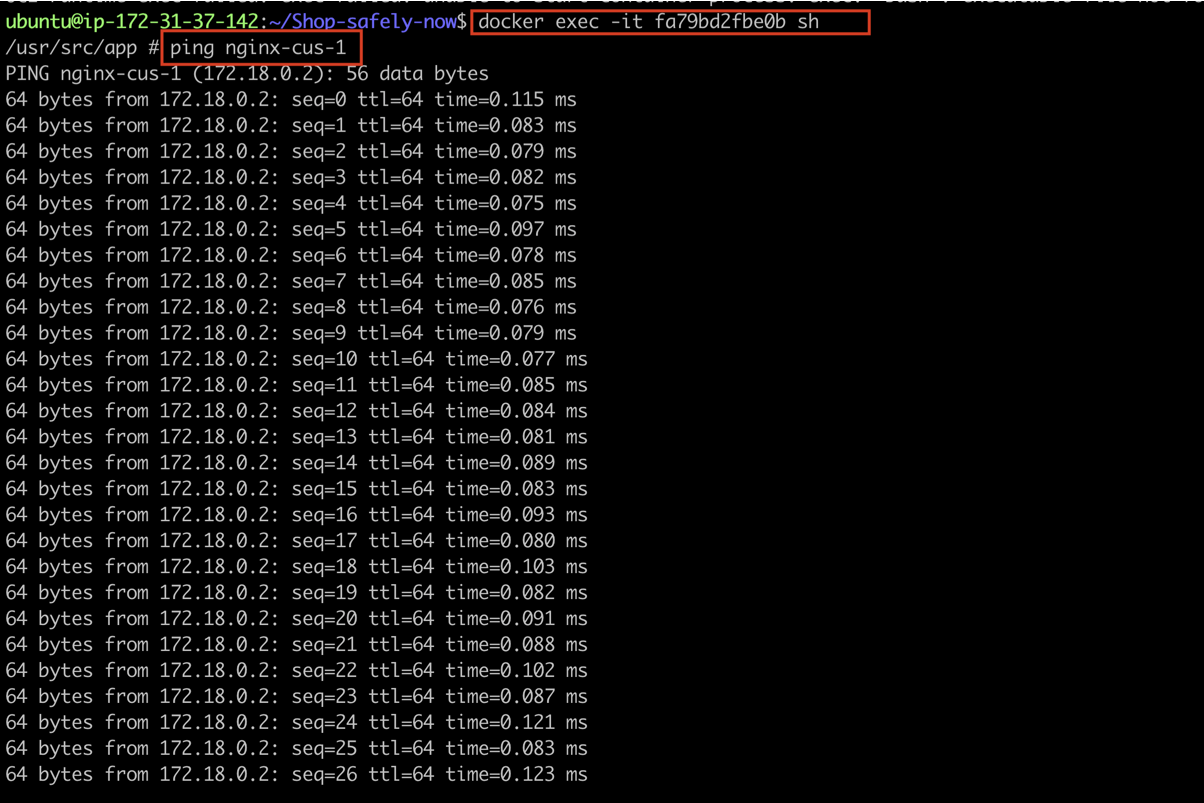
For instance, we can enter the "shop-safely-now" container and ping the other two containers.
docker exec -it containerID sh
However, attempting to ping the "shop-safely-now" container from the "nginx-def" container fails. This is because the "nginx-def" container is attached to the default bridge, not our custom bridge "nahid-net." We know that pinging between different networks is not possible. Hence, a bad request is received in this case.
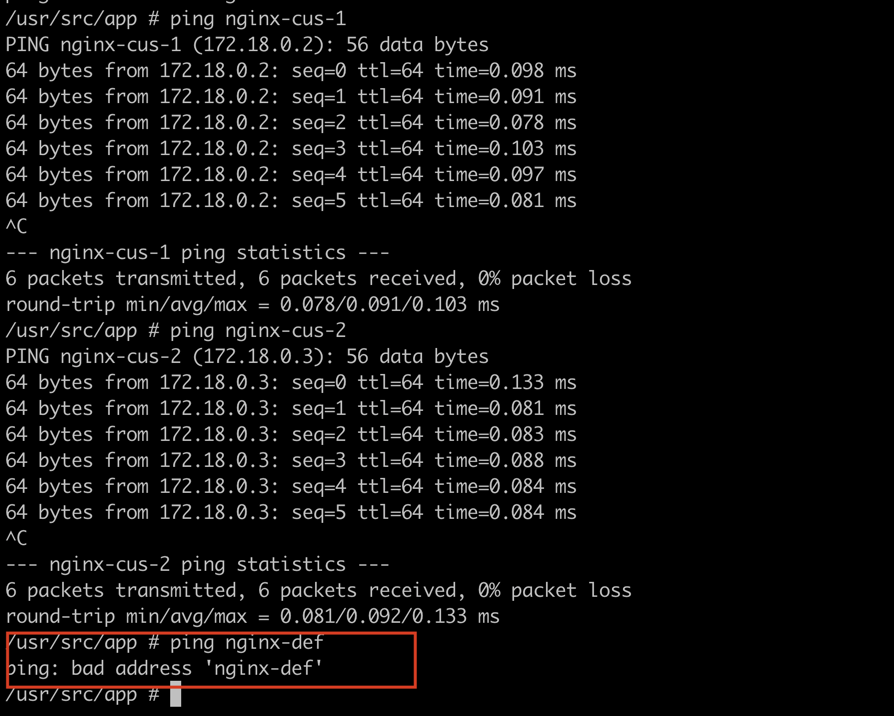
Because, all the custom containers are in the same subnets.
We might have a question in mind: why can't we ping a container in the custom bridge network from a container in the default bridge network?
When you create a custom bridge network, Docker sets up a separate isolated network namespace for that network. Containers attached to this custom bridge network can communicate with each other using their container names as hostnames, and they can also communicate with the host machine. However, by default, containers on one bridge network cannot directly communicate with containers on another bridge network or the default bridge network.
None Network:
it is like person in a toilet .. alone on it own 😅
Imagine you're throwing a big party, but one person just goes to the bathroom, locks the door, and stays there the whole time. They can’t hear the music 🎶, can't chat with anyone, and no one else knows what's going on inside. They’re completely disconnected from the party! That’s exactly what happens in none network mode in Docker. 😅
In this mode, the container is like that person—completely isolated from everything around it. No network, no communication with other containers or the host. It’s just chilling in its own little world, away from the action.
If you want your container to enjoy the party 🎉, you'll have to connect it to one of the other networks, like the bridge network or a custom network, where it can talk to the other containers.
In Docker networking, the none network mode is a special mode where a container is not connected to any network. Containers running in the none network mode have no network interfaces and no access to external networks, including the host network. This mode is useful in scenarios where you want to run a container without any networking capabilities.
Here's an example using the Nginx image:
docker run --network none nginx
Explanation:
- --network none: This option specifies that the container should run in the none network mode.
When you run a container in the none network mode, it won't have any network connectivity, meaning it can't communicate with other containers or external networks. This can be useful for scenarios where you want to create a completely isolated environment.
However, keep in mind that a container in the none network mode won't be reachable via the network, and you won't be able to access services running inside the container from outside. This mode is typically used in specific use cases where network connectivity is intentionally restricted.
If you need network connectivity for your container, you would usually use one of the other available network modes, such as the default bridge network, a user-defined / custom bridge network, the host network, or overlay networks in Docker Swarm. Each network mode provides different levels of isolation and connectivity for containers.
Overlay Networks (Swarm Mode):
In Docker Swarm, overlay networks facilitate communication between services running on different nodes.
Securely connects containers across multiple hosts.